Showing posts with label networking. Show all posts

Monday, January 13, 2020

Extending Multiple VLANs over trunk interface to Windows Server

Physical setup:

A Microsoft windows server with two NICs connected to a Network switch. There is a requirement to extend multiple VLANs to the server.

Steps:

Configure the network switch interfaces connected to the server as trunk ports. Trunk ports allow multiple VLANs to pass-through. Technically, All the packets passing through trunk ports must have an VlanID in the ethernet packet. the receiving switch decides where to forward the packet based on the VlanID tag. If any packet arrives without VlanID, it is considered as packet belonging to the VLAN marked as "Native VLAN". In cisco switches, "Vlan 1" is the default "Native VLAN".
Cisco Switch commands:

Sunday, July 06, 2014

Enabling SSH and block Telnet in Cisco Routers/Switches

SSH protocol encrypts the traffic between client and server in a remote session. So for network security purpose, we should enable only SSH access to networking devices.

Before enabling SSH, make sure we configured hostname and domain name properly. This will be used to store the name of the RSA key pair generated.  All the configurations are to be done in Global config mode.

hostname Router1
ip domain name ds.myorganization.in

Change hostname and 'ds.myorganization.in' domain name to your organization domain name. Now generate the RSA keys for SSH


crypto key generate rsa

This will ask the number of bits required for modulus function. Default is 512 bits but if we want to enable SSH version 2, bits should be more than 768. So, better keep 1024 bits.


Thursday, June 12, 2014

Setting up a Syslog server in Ubuntu for Cisco routers/switches

Configuration to be done in Ubuntu server

RSYSLOG is the default logging utility in Ubuntu. Main configuration file for rsyslog is /etc/rsyslog.conf. Make sure that there is a line as follows in the rsyslog.conf file.
$IncludeConfig /etc/rsyslog.d/*.conf
Now make a new file (say cisco.conf) in /etc/rsyslog.d directory.
Add these line to cisco.conf
local7.*    /var/log/cisco/cisco.log
This means that all syslog messages with facility (or tag) as local7 (Local7 is the default tag on all syslog messages from cisco devices) should be logged to cisco.log file at /var/log/cisco directory. So create a folder named cisco at /var/log and a blank document cisco.log inside that folder.
Now just restart rsyslog daemon using the command
sudo service rsyslog restart

Configuration to be done in Cisco device

In the Cisco router/switch whose logs are to be logged in the syslog server, configure the following :

logging Ubuntu_Server_IP
For example,
logging 192.168.2.1
Now all the logs from Cisco device will be logged to Syslog server in the Ubuntu machine. You can see the logs at System Log viewer by opening /var/log/cisco/cisco.log

Show running-config as read-only in Cisco routers without using AAA with TACACS+ and RADIUS

Sometimes it happens that we have to provide read only access to the running configuration of routers to someone who has a lower privilege. Cisco defines privilege level 15 as full access privileged EXEC mode and privilege level 1 as the normal user exec mode. In between levels are not defined by default. We can use privilege command to move commands from one privilege level to another.


commands:
privilege exec all level 10 show running-config

alias exec shrun show running-config view full

username hdesk privilege 10 secret hdesk@1234

Explanation:
  1. Move show running-config command to a privilege level 10
  2. But to view the running configuration, instead of show running-config, we have to type complete show running-config view full. So let's create a alias named shrun. This is optional.
  3. Now create a user with the privilege level 10. This user will be now able to see running configuration using the alias command shrun .

Thursday, January 09, 2014

Setting up wireless ad-hoc computer to computer network in Windows 8

 In earlier versions of Windows, It was easy to create ad-hoc network to share your internet connection with another computer or mobile through WiFi. In Windows 8 , there is no direct way to make ad-hoc network.

  1. Geeky way:
  2.    Use netsh wlan commands to setup a new network, and share your internet using Internet Connection Sharing (ICS)
    • Go to cmd . Right click and Run as administrator.
    • Type the following command
      netsh wlan set hostednetwork mode=allow ssid=network_name key=password_here
      For example:
      netsh wlan set hostednetwork mode=allow ssid=HOMEWIFI key=password1234
      (Note: Password should be minimum of 8 characters. )

Friday, November 22, 2013

Automatic back up of Cisco routers - Kron scheduler

If your are a network engineer, it is a monthly or weekly job to take back up of the router configurations . If it is a small network with a few routers or switches, it is easy to manage. But if it is a large network , It is a hectic job. So I rely on Cisco Kron command.

Monday, September 09, 2013

Monitoring BGP using NAGIOS

We can use check_bgp NAGIOS plugin for monitoring BGP. Visit  http://exchange.nagios.org/directory/Plugins/Network-Protocols/BGP-2D4/check_bgp/details for more details.

How to install and configure check_bgp plugin?

In the demonstration, I will be using NAGIOS server installed in Ubuntu Linux, and i want to monitor BGP in a Cisco ASR 1006 router. Since this plugin uses BGP4-MIB and SNMP, It can be used to monitor any router with SNMP.
  1. Download check_bgp.pl perl script from the link given above. 0.4 is the recent version.

Friday, September 06, 2013

How to find which application is using a TCP port in Windows

If a port is already in use by some unknown program and when you try to use the same port , you get a lot of errors like "Port already in use" , "Bind Exception" , "Port 80 already in use" etc. So in such case, You have to find out which process is already using this port and you can kill that process.

Steps to find which application is using a TCP port in Windows

  1. Type the command to find the Process ID
  2. Go to Run -> cmd and Type
     netstat -ano | more 

Thursday, September 05, 2013

Installing TFTP Server on Ubuntu

TFTP Server is usefull for PXE booting or configuring automatic back up of Cisco routers and Switches etc. Installing TFTP Server can be done in a few steps :

We are going install TFTP Server on a machine running Ubuntu ( version 10.04 32 bit Desktop Edition).

Steps to Install and Configure TFTP Server on Ubuntu

  1. Step 1: Install TFTP Server
  2. Either you can install using command line or Go to Ubuntu Software center. In command line type"sudo apt-get install tftpd-hpa" Or Search for tftpd-hpa in Software Center and click install

Tuesday, January 08, 2013

Configuring BSNL MTNL Internet on D-Link Wireless N 300 ADSL2+ (DSL-2750U) Router

New year wishes to all.
In this new year, the first thing i bought from Flipkart is a Dlink router/modem. They provided some CD along with the product. When i started to run the application in it , It got stuck at some stage. So i tried the usual way i configure a router . So i thought of sharing this so that it may help someone.


Configuring The modem

Physical set up

  1. Unpack your router. Connect the power adapter and switch on. Now the power led will be lit
  2. Connect a LAN cable from your computer to one of the four yellow LAN ports. And see whether the corresponding LED start blinking
  3. Now wait sometime so that the router will assign an IP to your computer.

Sunday, November 11, 2012

Accessing Ubuntu server using XDMCP Clients

Disadvantage of VNC Server

VNC Server will just replicate the session which is already active on the server to be accessed remotely. But if say , you've logged out of the server , then you cannot use VNC server to start a new session. For that you can use any XDMCP clients like XManager or XMing. I will demonstrate here how to use XMing in Windows Vista to start a new remote sessions with Ubuntu Server.

Settings to be done in Ubuntu Server:

You must enable XDMCP server on Ubuntu. For that go to /etc/gdm folder and edit custom.conf file present there. If not present, Create a new custom.conf file. In this add as follows:
[daemon]
RemoteGreeter=/usr/lib/gdm/gdmlogin

[xdmcp]
Enable=true
DisplaysPerHost=2

Now restart your GDM using sudo service gdm restart or get a full restart of the server.

MRTG Start Up Script for Ubuntu

MRTG as a Start Up Service in Ubuntu

I am monitoring a lot of routers and switches of my organization using MRTG ( Multi Router Traffic Grapher ) . It is one of the best tools to give you an overview of bandwidth utilizations, CPU/Memory Utilizations etc. Here is a small bash script to make all these MRTG process act as a service which is automatically start up at reboot.

Details of MRTG

I am using MRTG with RRDTool using routers.cgi script. My MRTG configurations arrangements are like
  • Location1 Folder
    • router.cfg
    • switch.cfg
    • servers.cfg
  • Location2 Folder
    • router.cfg
    • switch.cfg
    • servers.cfg
  • Location3 Folder
    • SubLocation1 Folder
      • router.cfg
      • switch.cfg
      • servers.cfg
    • SubLocation2 Folder
      • router.cfg
      • switch.cfg
      • servers.cfg
    • router.cfg

Friday, November 02, 2012

Firewall in Ubuntu

How to set up a firewall in Ubuntu ?

Firewall is already in built into your Linux kernel. You just want to configure it properly for your needs !

Firewall is for filtering all the traffic which is headed into or out of your computer. In Linux Kernel , netfilter subsystem take care of this traffic. You just add the rules for accepting, rejecting or denying the traffic.

How to add rules into netfilter ?

 Use the IPTABLES . Iptables are really complex and flexible . See Basic How to of Iptables here https://help.ubuntu.com/community/IptablesHowTo  . 

UFW, Uncomplicated FireWall

There are many high level user interfaces for this Iptables. One is pre-installed with all Ubuntu distros higher that 8.04 , ie UFW or Uncomplicated FireWall . See more here https://help.ubuntu.com/community/UFW .  

GUFW, a Graphical Interface for UFW

GUFW is a GUI interface for UFW which is very easy to use and add rules .See more here https://help.ubuntu.com/community/Gufw

Thursday, October 25, 2012

Installing / Uninstalling .deb files in Ubuntu

In Ubuntu , the package files are in .deb files . To install the packages file , you should be having administrative password.


Installing .deb debian package file in Ubuntu


  • Double click the .deb file , it will be automatically opened with the GDebi Package manager and you can install it
  • From command line , use this command to install a package .
    sudo dpkg -i PACKAGEFILE.deb

Uninstalling a package in Ubuntu

  • From command line, use this command
    sudo dpkg -r PACKAGENAME

Internet Proxy authentication in Ubuntu

How to solve "407 Proxy Authentication Required" error in Ubuntu ?

This was one question i was behind from last few days.  Use CNTLM , that's the best answer I got.
CNTLM will make your ubuntu server act as a proxy server and in behind authenticates with your actual proxy server .

Step 1:  Download the package file from the CNTLM website . While writing this, version 0.92.3 is the latest and the link to it is http://citylan.dl.sourceforge.net/project/cntlm/cntlm/cntlm%200.92.3/cntlm_0.92.3_i386.deb

Step 2: Install .deb file . See How to install .deb files in Ubuntu here

Step 3:  cntlm configuration file is located at /etc/cntlm.conf . Open it using your preferred text editor in edit mode . If you use gedit , type " sudo gedit /etc/cntlm.conf "

Step 4:  In cntlm.conf ,  edit the following fields
    Username   YOUR_USERNAME_HERE
    Domain     YOUR_ORGANIZATION_DOMAIN(Contact your Active Directory admin if you don't knw this)
    Password YOUR_PASSWORD
    Proxy  YOUR_PROXY_SERVER_IP_WITH_PORT
    NoProxy LIST_ALL_IP_WITH_NO_PROXY_REQUIREMENT
    Listen SOME_PORT
Sample config here:
   Username   0906895
   Domain     ABC
   Password   rndmpasswd@123
   Proxy  10.18.200.203:8080
   Proxy  10.18.200.204:8080
   NoProxy  localhost, 127.0.0.*, 10.*
   Listen  8080


Step 5:  After changes in configuration files, restart the cntlm service .
 sudo service cntlm restart

Now cntlm started working and your ubuntu server is acting as another proxy server . So add localhost as the system proxy server.

System Proxy setting:

Go to System -> Preference -> Network Proxy
In the Network Proxy Preference window,  Set Manual proxy configuration . Proxy server as localhost and port as the port number you specified in " Listen SOME_PORT" .


Friday, October 05, 2012

How to monitor Windows machine using NAGIOS - NRPE

For monitoring system parameters of a windows computer using NAGIOS or Icinga , the best tool available is NSClient++ ( Visit http://nsclient.org)

 Here I demonstrate NSClient++ isntallation to monitor Windows Vista machine using NAGIOS installed on a Ubuntu server. Without  NAGIOS or Icinga , NSclient++ is meaningless .

Step 1 :  Download NSClient++ tool in your Windows PC . (http://files.nsclient.org/x-0.4.x/NSCP-0.4.0.183-Win32.msi is the latest one as of now. )

Step 2 : Install it . Type your NAGIOS server IP as allowed hosts . Also enable common check and NRPE server during installation .
 Step 3 :  Finish the installation . Installation directory will be C:\Program Files\NSClient++ . Go to that directory and find the configuration file .  In NSClient++ version 0.4 , it is nsclient.ini   . In version 0.3 it is NSC.ini  .

Step 4:  Make sure that in the [modules] section contains lines NRPEListener.dll , CheckExternalScripts.dll and some checks like CheckSystem.dll , CheckDisk.dll , CheckEventLog.dll , CheckHelpers.dll

My modules section is as follows:

[modules]
NRPEListener.dll
NSClientListener.dll
FileLogger.dll
CheckSystem.dll
CheckDisk.dll
CheckEventLog.dll
CheckHelpers.dll
CheckExternalScripts.dll

Step 5: For NSClient++ version 0.4 ,  In the section [/settings/NRPE/server]

Add these lines.
allowed hosts=10.52.2.41(This is my NAGIOS server IP , give yours here!)
allow arguements=1
port=5666
allow nasty characters=1

For NSClient++  version 0.3  , In the section  [NRPE]

Uncomment these options .
port=5666
allow_arguments=1
allow_nasty_meta_chars=1
allowed_hosts=10.52.2.41

Step 6: Go to Run and type services.msc . Find the NSClient++ service and restart that .


Now we have finished the configuration in Windows machine . Now in the ubuntu machine running nagios , try to get the NRPE check statuses in the command line . If it is working fine , we will add services in NAGIOS .

Step 1 :  Check whether you installed nagios-nrpe-plugin . If not , install it . You can use the command  "dpkg -L nagios-nrpe-plugin " to check it .

Step 2 .  Now try to get some status from the windows machine(IP address is 10.52.20.3 ) by command
"/usr/lib/nagios/plugins/check_nrpe  -H 10.52.20.3  -c alias_cpu" .  If this gives
OK CPU Load ok.|'5m'=4%;80;90 '1m'=5%;80;90 '30s'=5%;80;90  as the output, you configured NSClient++ properly .

If not working please check whether the port you mentioned is not blocked .

Step 3 : If working ,  you can add the commands to NAGIOS .
For the host you want to monitor , add a service .

define service{
        use                             generic-service         ; Name of service template to use
        host_name                       vistamachine
        service_description             Drive Usage
        check_command                   check_nrpe!alias_disk
        }


Monday, December 19, 2011

Starting / Stopping IIS service in windows

Sometimes , If you want to run Apache server , you may want to stop Windows IIS server .  To do that ,
Go to Control Panel -> Administrative tools -> Services .
Right click World Wide Web Publishing Servie -> Properties


Then select Stop.

Sunday, June 19, 2011

Changing BSNL router configurations (Passwords / DNS etc)

If you are using BSNL as your ISP, you can configure and change the settings of your router by a web inteface.

In your web browser(firefox, google chrome etc), type 192.168.1.1 in the address bar . It asks for username and password. Default username and password provided by BSNL is "admin" and 'admin' respectively. After your first login, change the password.

Once you login, you have four menu items.
  1. Device Info:
  2. Here, you get all the informations about your network, WAN , LAN , IP addresses, DNS address etc.
  3.  Advanced setup
  4. Here, you can change the settings of LAN , WAN , etc
  5. Diagonostics
  6. Management
  7. Here you have system logs, back up features , internet time synch and changing access passwords of the router etc. 

How to change BSNL router password?

 IMPORTANT: Change your router password as soon as you login for the first time itself.Otherwise, attackers can easily access your networks. For eg: someone else can change your WiFi settings so that it can be accessed by public.

For changing , first of all go to 192.168.1.1 in your web browser(like Internet Explorer, Firefox, Google Chrome etc) and give default username and password both as "admin". Go to "Management"->"Access control"->"passwords". Select user as "admin" and type your old and new password and then "save&reboot". Done!

How to change DNS server addresses of your router ?

Login to 192.168.1.1 . Then go to "Advanced setup" ->"DNS"->"DNS Server". If you want to add DNS server other than that used by BSNL, untick " Enable Automatic Assigned DNS" and add your primary and secondary DNS server address. You can use OpenDNS server addresses ie 208.67.222.222 and 208.67.220.220.(Why?)

Monday, November 16, 2009

Nagios Remote Plugin Executor ( NRPE ) installation in Ubuntu

( See also NRPE for monitoring Windows  )
The NRPE  (Nagios Remote Plugin Executor) addon is designed to allow you to execute Nagios plugins on remote Linux/Unix machines. The main reason for doing this is to allow Nagios to monitor "local" resources (like CPU load, memory usage, etc.) on remote machines. Since these public resources are not usually exposed to external machines, an agent like NRPE must be installed on the remote Linux/Unix machines.


DESIGN OVERVIEW


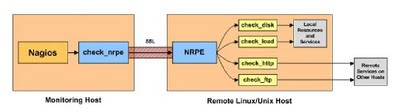
The NRPE addon consists of two pieces:
* The check_nrpe plugin, which resides on the local monitoring machine.
* The NRPE daemon, which runs on the remote Linux/Unix machine

When Nagios needs to monitor a resource of service from a remote Linux/Unix machine:
* Nagios will execute the check_nrpe plugin and tell it what service needs to be checked

*The check_nrpe plugin contacts the NRPE daemon on the remote host over an (optionally) SSL
protected connection.

*The NRPE daemon runs the appropriate Nagios plugin to check the service or resource.

*The results from the service check are passed from the NRPE daemon back to the check_nrpe
plugin, which then returns the check results to the Nagios process.

INSTALLATION

REMOTE HOST SETUP

1) Install nagios plugins

These instructions should be completed on the remote Linux/Unix host where the NRPE daemon to be installed .


i.Create a user account for nagios

/usr/sbin/useradd nagios
passwd nagios


ii. Install the Nagios Plugins .Download the source code tarball of the Nagios plugins (visit:
http://www.nagios.org/download

ii.Extract the Nagios plugins source code tarball.
tar xzf nagios-plugins-1.4.6.tar.gz
cd nagios-plugins-1.4.6 .


iv. Compile and install the plugins.
./configure
make
make install


v.The permissions on the plugin directory and the plugins will need to be fixed at this point,
chown nagios.nagios /usr/local/nagios
chown -R nagios.nagios /usr/local/nagios/libexec


vi. Install xinetd
sudo apt-get install xinetd

2) Install the NRPE daemon

i.Download the source code tarball of the NRPE addon.
(visit:http://prdownloads.sourceforge.net/sourceforge/nagios/nrpe-2.12.tar.gz) .

ii.Extract the NRPE source code tarball.
tar xzf nrpe-2.8.tar.gz
cd nrpe-2.8


iii. Compile the NRPE addon.
./configure
make all


iv. Install the NRPE plugin , daemon, and sample daemon config file.
make install-plugin
make install-daemon
make install-daemon-config


v. Install the NRPE daemon as a service under xinetd.
make install-xinetd

vi. Edit the /etc/xinetd.d/nrpe file and add the IP address of the monitoring server to the
only_from directive.
only_from = 127.0.0.1

vii. Add the following entry for the NRPE daemon to the /etc/services file.
nrpe 5666/tcp # NRPE

viii. Restart the xinetd service.
service xinetd restart

3) Test the NRPE daemon locally.

Its time to see if things are working properly. Make sure the nrpe daemon is running under xinetd.
Check the command :
netstat -at | grep nrpe

The output out this command should show something like this:
tcp 0 0 *:nrpe *:* LISTEN

Next, check to make sure the NRPE daemon is functioning properly. To do this, run the check_nrpe plugin that was installed for testing purposes.
/usr/local/nagios/libexec/check_nrpe -H localhost

You should get a string back that tells you what version of NRPE is installed, like this:
NRPE v2.8

So you finished the remote host part..Now you have to configure the monitoring host.

Instant File sharing in LAN

Do you wanna share something in the local area network quickly..without wasting your time with apache or any daemons..here is the technique for that..

First of all, open a terminal and move into the folder you wanna share.Say i want to share /home/xxx/Downloads folder..So open a terminal and then cd /home/xxx/Downloads.

Then type this command

python -c "import SimpleHTTPServer; SimpleHTTPServer.test();"


Then your folder can be accessed through web browser by typing http://your_ip:8000/.


Njoy